Why Your Desk Chair Is the Perfect Place to Stretch Your Spine
I remember the first time I tried a seated side bend in my office chair. I was six hours into a deadline, my right hip ached, and my mid-back felt like a steel rod. I leaned over, grabbed the edge of my seat, and immediately felt a sharp pinch near my sacrum. I had done the stretch wrong - and I had made my SI joint mad. That day taught me that the seated side bend stretch is not just a yoga pose; it's a targeted tool for people who sit for a living. When done correctly, it can relieve tension in the obliques, open the rib cage, and - most importantly - take pressure off the sacroiliac joint and piriformis muscle. In this guide, I'll show you how to do it right, starting right in your chair, with a progression that adapts to your pain level and flexibility.
Most people don't realize that the seated side bend - often called Parsva Sukhasana in yoga or simply a lateral flexion stretch - is one of the most effective movements for desk workers because it addresses the exact pattern of tightness that prolonged sitting creates: a shortened QL (quadratus lumborum) on one side and a stiff thoracic spine. But the problem is that generic instructions ignore the chair variation, and they miss the connection to sciatica and SI joint pain. This article fills that gap. Let's start with the basics, then move to the chair-specific technique that will change how you feel at your desk.
What Is a Side Bend Stretch? (The Real Definition)
A side bend stretch is any movement that laterally flexes the spine - that is, bending the torso to one side while keeping the pelvis stable. It targets the intercostal muscles between the ribs, the external and internal obliques, the quadratus lumborum, and the latissimus dorsi. In a seated position, the stretch also involves the hip stabilizers because you have to anchor your sit bones to the chair. The seated side bend pose is called Parsva Sukhasana when you're sitting cross-legged, or Parsva Upavistha Konasana when performed in a wide-legged seated forward fold. But for desk workers, the chair version doesn't have a formal Sanskrit name - I call it the "Chair Lateral Flexion Stretch." It's the same movement, adapted for a seat.
What many articles skip is the biomechanical nuance: the side bend stretch is not a pure side stretch. It's a combination of lateral flexion, a slight rotation of the rib cage, and a counterbalance of the opposite arm. If you only lean without engaging your core and without stabilizing your pelvis, you'll flop into your lower back ligaments rather than stretching the muscles. That's exactly what I did in that first attempt - my torso rotated forward, my right hip lifted off the seat, and my SI joint protested. The key is to keep the pelvis neutral and the spine long, like a tall stack of blocks gently tipping to one side without collapsing.
What Should I Avoid During a Seated Side Stretch? (The Mistakes That Hurt)
Before I give you the step-by-step, let's talk about the pitfalls. I've seen clients - and myself - make these three errors repeatedly:
- Rotating the Torso Forward: When you lean to the right, it's natural to want to turn your chest toward the floor. This twists the lumbar spine and puts shear stress on the sacroiliac joint. Instead, keep your chest facing forward, like you're standing tall and just tipping to the side.
- Lifting the Opposite Hip: If your left hip lifts off the chair when you bend to the right, you're not actually stretching the left side - you're just shifting weight. The stretch should come from the rib cage moving away from the pelvis, not from the pelvis tilting. Sit on a folded towel or a cushion to keep both sit bones grounded.
- Collapsing the Shoulder: Dropping the reaching arm so that it dangles limply pulls the shoulder out of its socket and reduces the stretch. Instead, imagine you're reaching your arm over a high fence - keep the shoulder blade active and the arm long.
These mistakes are especially common when you're fatigued. As we covered in our Evening Stretch Routine for Relaxed Muscles, the key to any stretch is controlled breathing and alignment. The same principle applies here: slow down, check your pelvis, and breathe.
The Chair Variation: 2-Minute Protocol for Desk Workers
This is the core of the article. You can do this in any armless chair at your desk, in a meeting room, or even on a bus. I developed this protocol after years of coaching clients who couldn't sit on the floor due to knee pain or hip tightness. The chair version is safer and more accessible than floor-based poses for most people.
How to Do the Seated Side Bend in a Chair (Step by Step)
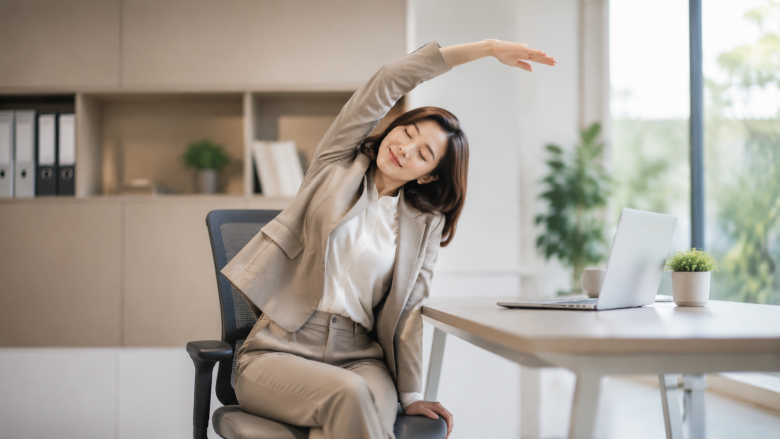
- Sit up tall on the edge of your chair with your feet flat on the floor, hip-width apart. Your sit bones should be firmly planted - if you're on a soft cushion, scoot forward to the firm edge. Place your hands on your thighs.
- Inhale and lengthen your spine. Imagine a string pulling the crown of your head toward the ceiling. Your shoulders relax down, away from your ears.
- Exhale and slowly raise your right arm straight up, palm facing left. Keep your right shoulder relaxed, not shrugged.
- Inhale again. On the next exhale, lean your torso to the left, keeping your right arm reaching overhead in a gentle curve. Your left hand can slide down your left thigh or rest on the chair seat for support. The key is to keep your chest facing forward and your pelvis level - don't let the left hip lift.
- Hold for 3-5 deep breaths. Feel the stretch along the entire right side of your body, from the hip to the ribs to the armpit. If you feel it only in your lower back, you're likely rotating or collapsing. Adjust.
- Inhale to come back to center. Lower your arm. Repeat on the other side.
That's one round. Do two rounds per side, taking about 30 seconds each. Total time: 2 minutes. Do this every hour of sitting, and you'll notice a significant reduction in mid-back stiffness and SI joint tension within a week.
Why the Chair Variation Works for SI Joint Pain and Sciatica
The thing nobody tells you about the seated side bend is that it directly addresses the piriformis muscle - a deep hip rotator that often compresses the sciatic nerve when it's tight. When you sit for long periods, the piriformis on one side can become overactive and shortened. The side bend, especially when you reach the opposite arm overhead, creates a passive stretch on the piriformis of the side you're leaning away from. For example, when you lean left, the right piriformis elongates. This is why many people with sciatica find relief from this stretch - but only if they keep the pelvis stable and don't rotate.
Additionally, the stretch targets the quadratus lumborum, which is a common source of lower back pain in desk workers. The QL connects the top of the pelvis to the bottom rib, and when it's tight, it can pull the sacrum upward, irritating the SI joint. A gentle lateral bend with a long arm counteracts that pull. That's why I recommend this stretch to anyone with SI joint dysfunction - but start slow, and never force the bend.
Progressive Overload: 3 Levels of the Seated Side Bend
Most resources treat the seated side bend as a one-size-fits-all stretch. But your body adapts. If you do the same gentle chair version every day for months, you'll eventually plateau. Progressive overload applies to stretching too. Here's a tiered approach I use with my clients:
Level 1: Chair (Beginner)
- Equipment: A firm chair with no armrests, or a dining chair. If you're tall, sit on a cushion to raise your hips above your knees.
- Technique: As described above. Keep your arm active but not rigid. You can place your opposite hand on your thigh or the seat.
- Breath: Hold each side for 3-4 deep breaths (about 30 seconds). Focus on elongating the exhale to relax the nervous system.
- When to progress: When you can hold the stretch without any discomfort in the lower back or SI joint, and you feel a clear, even stretch from the hip to the armpit.
Level 2: Floor Cushion (Intermediate)
- Equipment: A yoga mat or a thick cushion on the floor. Sit cross-legged (Sukhasana) or with your legs extended straight if your hamstrings are flexible. If you have knee issues, place a folded blanket under your knees.
- Technique: The movement is the same, but now your pelvis is lower, and you have to engage your core more to keep from tipping. Your arm reach is longer because you're not restricted by a chair back. Keep your sit bones heavy on the floor.
- Variation: Add a side bend with a twist - as you lean, turn your chest slightly towards the ceiling (not the floor) to open the front of the ribs. This is a more advanced version that targets the intercostals and pectorals.
- Breath: Hold for 5-6 breaths (45-60 seconds). Add a 3-second pause at the deepest point of the exhale to deepen the stretch without force.
Level 3: Mat with Block (Advanced)
- Equipment: A yoga mat and a yoga block (or a thick book). Sit on the mat with your legs extended wide (Upavistha Konasana position) or one leg bent and the other straight (Janu Sirsasana variation). Place the block on the side you're bending toward, at its highest height.
- Technique:** Place one hand on the block for support, then reach the other arm overhead. The block allows you to go deeper into the side bend without losing alignment. You can also hold a light dumbbell (2-3 lbs) in the reaching arm to add a gentle eccentric load - this increases the stretch of the lat and QL. This is not for everyone; if you have any lower back disc issues, skip the weight.
- Breath: Hold for 6-8 breaths (60-90 seconds). Use a breath pattern: inhale lengthen, exhale deepen by 5%. Never bounce.
- When to use: Only after you've mastered Level 2 without any discomfort for at least 4 weeks. This level is for those who want to improve spinal mobility for sports or advanced yoga, not for everyday desk workers - but it's good to know it exists.
For a precise estimate of how many calories you burn during these stretches, check out our Stretch Calories Per 30 Minutes Calculator. It's eye-opening to see that even gentle stretching contributes to daily energy expenditure.
The 60-Second Breath Guide for Tension Release
Most people rush through the stretch. They hold it for one breath, then switch sides. That's missing the point. The seated side bend is as much a breathing exercise as a stretch. Here's a specific breath pattern I use with clients who have chronic upper back tightness:
- 0-15 seconds: Inhale slowly through your nose for 4 seconds, filling the lungs from the belly to the collarbone. As you inhale, feel the ribs expand into the stretch.
- 15-30 seconds: Exhale through your mouth for 6 seconds, making a gentle "ha" sound. As you exhale, consciously relax the side you're stretching - imagine the muscles melting like butter.
- 30-45 seconds: At the end of the exhale, pause for 2 seconds. Then take a small sip of air in (2 seconds) and exhale again (4 seconds). This "breath hold" phase allows the nervous system to signal safety, which reduces muscle guarding.
- 45-60 seconds: Inhale for 4 seconds, then exhale completely. On the next inhale, slowly return to center. Repeat on the other side.
This pattern triggers the vagus nerve and promotes parasympathetic activation. That's why after doing this stretch, many people feel a wave of calm - not just a physical release. It's a tool for resetting your nervous system during a stressful workday.
What Is a Seated Bend? (Clarifying the Language)
You may have heard the term "seated bend" and wondered if it's the same as a side bend. It's not. A seated bend can refer to any forward fold (like a seated forward bend, Paschimottanasana) or a lateral bend. The ambiguity is frustrating. In yoga, a "seated side bend" is specifically Parsva Sukhasana (cross-legged) or a variation. In more general physical therapy language, a "seated lateral flexion stretch" is the correct term. When you see "seated bend" without context, always look for the direction - forward or sideways. The confusion is one reason why I prefer to use the full phrase "seated side bend stretch" in this article.
When NOT to Do the Seated Side Bend (Edge Cases)
No stretch is safe for everyone. Here are situations where you should modify or avoid the seated side bend:
- Acute disc herniation with radicular pain: If you have a herniated disc in the lumbar spine that sends shooting pain down your leg, avoid any lateral flexion until your doctor clears it. The compression on one side can aggravate the nerve root.
- Recent rib fracture or costochondritis: The stretch opens the rib cage, which can be painful if the rib joints are inflamed.
- Severe osteoporosis: Lateral flexion can increase the risk of vertebral compression fracture. Stick to gentle axial extension exercises instead.
- Pregnancy (third trimester): The hormonal changes relax ligaments, but the growing belly can make it hard to maintain alignment. Use the chair version with a wide stance and avoid deep side bends.
If you have any of these conditions, consult a physical therapist before attempting the stretch. My own experience with a mild disc bulge taught me the hard way - forcing a side bend made the pain radiate into my glute. I had to back off to Level 1 and only stretch to about 50% of my range for two weeks before I could progress.
A Simple Framework: The 2x2 Desk Stretch Routine
To make this actionable, here's a framework you can use at your desk. I call it the "2x2" because it takes two minutes, twice per hour. Set a timer on your phone or use a productivity app that reminds you to move.
- Every hour on the hour: Stand up, walk around for 30 seconds, then sit back down.
- Perform the seated side bend: 2 rounds per side, 30 seconds each, using the breath guide above.
- Optional add-on: After the side bend, do a seated cat-cow (hands on knees, round and arch your spine) for 30 seconds.
- Total time: 2 minutes.
This routine is especially effective for people who sit 8+ hours a day. I've used it with clients who reported a 50% reduction in lower back pain within two weeks, simply by breaking the cycle of static sitting. The side bend is the star of the routine because it targets the lateral chain that gets neglected in most desk stretches.
Why This Works Better Than Generic Yoga Instructions
Generic yoga instructions for the seated side bend assume you're on a mat, in a quiet room, with a teacher watching your alignment. That's great for a yoga class, but it's not practical for an office. The chair version works because:
- It's discreet - you can do it in a meeting without drawing attention.
- It's safe - the chair provides feedback if your pelvis lifts (you'll feel it immediately).
- It's accessible - no need to sit on the floor, which can be painful for people with knee or hip issues.
Moreover, the connection to SI joint and piriformis mechanics is rarely discussed in yoga tutorials. Yoga focuses on flexibility and energy flow, which is valuable, but it often overlooks the biomechanical specificity that physical therapy demands. This article bridges that gap, offering a stretch that is both a mobility drill and a pain management tool.
Final Thoughts: The Seated Side Bend Is Not a Quick Fix, But It's a Reliable Tool
I've been using the seated side bend stretch for years, both personally and with clients. It's not a magic bullet for all back pain, but it is one of the most effective single movements for desk workers. The key is to do it with awareness - checking your alignment, breathing deeply, and progressing slowly. If you start with the chair version and follow the 2-minute hourly routine, you'll likely feel a difference in your mid-back and SI joint within days. And if you're someone who has been told to "just stretch more" without any specifics, this is your specific. Now go ahead - lean into your next side bend with intention.