Why Wall Push-Ups Are the Starting Line (Not the Finish Line)
When I first tried to train upper body, I couldn't do a single push-up on the floor. My arms shook, my back arched, and my ego took a hit. That's when a coach pulled me aside and said, "Stand up. Use the wall." It felt too easy at first, but he was right. Wall push-ups are not a consolation prize -- they are the first rung on a ladder that leads to full push-ups, dips, and even handstands. The problem is that most beginners get stuck on the wall because no one tells them when or how to move on.
This guide is built around the Wall-to-Floor Progression System, a step-by-step roadmap that teaches you not just the form, but the exact checkpoints to advance. You'll learn how many wall push-ups a beginner should do, what mistakes to avoid, and how to pair wall push-ups with other exercises so you build real strength -- not just vanity reps. By the end, you'll have a clear path from standing at the wall to pressing off the floor.
Why Wall Push-Ups Matter for Overall Calisthenics Progression
Most people think of wall push-ups as a rehab move or something for the elderly. That's a mistake. Wall push-ups are a fundamental tool for building scapular control, shoulder stability, and proper push-up mechanics without the load of full body weight. The thing nobody tells you is that the scapula -- the wing-shaped bone on your back -- is the engine of the push-up. If your scapula doesn't move correctly on the wall, it won't move correctly on the floor.
Wall push-ups also teach you to maintain a straight line from head to heels. That line is the number one thing that breaks down under load. When I train beginners, I see them arch their lower back or let their hips sag the moment they try a floor push-up. Wall push-ups remove the weight factor so you can focus on that line. Once you own it, you can load it.
For a broader look at how gentle movement can support your overall fitness -- and even help you estimate calorie burn during yoga or other low-impact work -- check out our Yoga Calories For Beginners Calculator. It's a useful tool to see how even small efforts add up over time.
The Wall-to-Floor Progression System
This system has four stages. Each stage has a specific checkpoint you must pass before moving to the next. Do not skip stages. I've seen people rush from wall push-ups to floor push-ups in a week and end up with shoulder pain. Your body needs time to adapt.
Stage 1: Wall Push-Ups (Vertical)
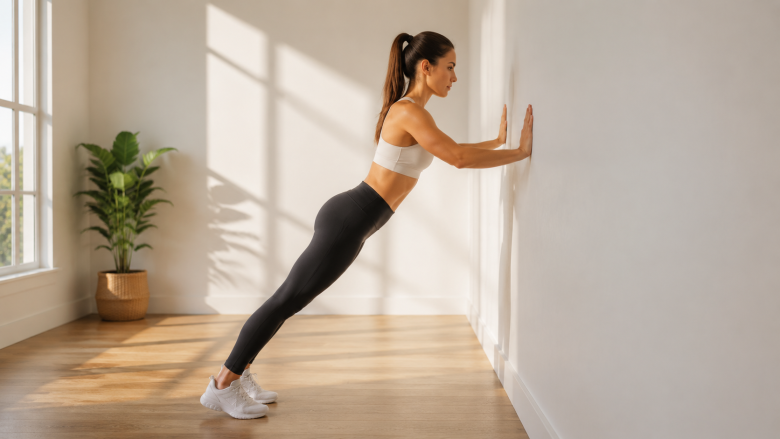
Setup: Stand facing a wall, feet shoulder-width apart, about an arm's length away. Place your palms flat on the wall at shoulder height and shoulder-width apart. Walk your feet back slightly so your body is at a 45-degree angle to the wall. Your hands should be at chest level, not eye level -- one of the most common mistakes beginners make.
Form: Keep your body straight from ankles to shoulders. Engage your core as if someone is about to poke your stomach. Bend your elbows and bring your chest toward the wall. Your elbows should travel at a 45-degree angle from your torso, not flaring out to the sides. Pause when your nose almost touches the wall. Push back to start. That's one rep.
Checkpoint to advance: Complete 3 sets of 20 reps with perfect form. Perfect form means: no hip sag, no flared elbows, no arched lower back, and you can feel your chest and triceps working. If you can do 3x20 without breaking a sweat, you are ready for Stage 2.
Stage 2: Incline Push-Ups (45-Degree Angle)
Setup: Find a sturdy bench, table, or sofa seat that is about waist height. Place your hands on the edge, slightly wider than shoulder-width. Walk your feet back until your body is in a straight line from head to heels. The angle of your body relative to the floor should be roughly 45 degrees.
Form: Lower your chest toward the bench. Keep your elbows at that 45-degree angle. Do not let your head drop forward. Push through your palms and extend your arms. The most common mistake here is letting the wrists cave inward. Keep your palms flat and fingers spread for stability.
Checkpoint to advance: 3 sets of 15 reps with perfect form. If you can do this, your upper body and core have enough strength to try the next stage.
Stage 3: Incline Push-Ups (30-Degree Angle)
Setup: Use a lower surface -- a sturdy coffee table, a low step, or a yoga block stack. The lower the surface, the more body weight you'll press. Aim for a 30-degree angle. Your hands should still be under your shoulders, but you'll feel more load in your chest and triceps.
Form: Same as Stage 2, but now you need to be extra careful about your core. If your hips sag, you're not ready. Drop back to Stage 2 and work on glute and core engagement.
Checkpoint to advance: 3 sets of 12 reps with perfect form. Once you hit this, your body is ready for the floor.
Stage 4: Full Floor Push-Ups
Setup: Start in a plank position with hands under shoulders, feet together or hip-width apart. Your body should be a straight line from head to heels.
Form: Lower your chest to the floor. Keep elbows at 45 degrees. Push through the floor, driving your palms into the ground. Do not let your head drop. If you cannot do even one rep with perfect form, go back to Stage 3 and increase your volume.
Checkpoint to advance further: Once you can do 3 sets of 10 full floor push-ups, you can start exploring variations like diamond push-ups or decline push-ups.
How Many Wall Push-Ups Should a Beginner Do?
If you're starting from zero, aim for 3 sets of 8 to 10 reps. Rest 60 seconds between sets. Do this every other day. Your muscles need recovery to adapt. After the first week, increase to 3 sets of 12. By the end of week two, you should be able to do 3 sets of 15. If you feel pain in your wrists or shoulders, scale back. The number of reps matters less than the quality of each rep.
Once you can comfortably do 3 sets of 20, you are ready to move to the incline stages. The key is to listen to your body. If you're still shaking on rep 12, stay at that rep range until your form is solid. There is no prize for rushing.
Common Mistakes for Wall Push-Ups (and How to Fix Them)
I've watched dozens of beginners perform wall push-ups, and I've made every mistake myself. Here are the most common ones and the corrections that actually work.
Mistake 1: Hands Too High
When you place your hands at eye level or above, you shift the load to your shoulders and upper traps. The wall push-up becomes a shoulder shrug, not a chest exercise. Fix: Place your hands at chest level, directly below your shoulders. Your elbows should bend to about 90 degrees at the bottom of the rep.
Mistake 2: Flared Elbows
If your elbows point out to the sides like a T, you put excessive stress on your shoulder joints. This is a leading cause of shoulder impingement. Fix: Keep your elbows at a 45-degree angle from your torso. Imagine you are trying to squeeze a grape between your armpits. This position engages your lats and protects your shoulders.
Mistake 3: Arched Lower Back
An arched back shifts the load away from your core and onto your lumbar spine. Over time, this can cause back pain. Fix: Squeeze your glutes and brace your abs as if you are about to take a punch. Keep your body in a straight line. If you can't feel your core working, you are likely arching.
Mistake 4: Moving Too Fast
Using momentum to bounce off the wall robs your muscles of tension. You're not building strength; you're just swinging. Fix: Take 2 seconds to lower, pause at the bottom for 1 second, and take 2 seconds to push back. Control the eccentric phase.
Mistake 5: Wrist Pain
If your wrists hurt during wall push-ups, it's often because your hands are too far apart or you are letting your wrists bend backward. Fix: Spread your fingers wide and grip the wall with your fingertips. Keep your wrists in a neutral position. If pain persists, try using a pair of push-up handles or making fists with your hands and pressing through your knuckles. An alternative is to do the push-ups on your forearms (like a plank) for a few weeks to strengthen the wrists.
Troubleshooting Shoulder and Wrist Discomfort
Wall push-ups are generally joint-friendly, but if you have pre-existing issues, you need to adapt. Here are two specific scenarios I've encountered.
Shoulder Impingement or Pinching
If you feel a sharp pinch in the front of your shoulder during the lowering phase, you are likely letting your elbows flare out or your hands drift too high. Fix: Narrow your hand placement slightly (hands under shoulders, not wider). Keep your elbows tucked closer to your ribs. Also, before each set, do 10 scapular retractions: stand tall, squeeze your shoulder blades together, hold for 5 seconds, release. This wakes up the muscles that stabilize your shoulder blades.
Wrist Pain
Wrist pain is common if you have weak wrists or spend a lot of time typing. Fix: Use a pair of push-up bars or parallel bars. If you don't have those, make fists and press through your knuckles. This keeps the wrist in a neutral position. Another option: perform the wall push-up on your forearms (like a forearm plank) but with a push-up motion. To do this, place your forearms flat against the wall, elbows bent at 90 degrees, and push through your forearms to straighten. It's a different stimulus but still works the chest and triceps without wrist flexion.
Integrating Wall Push-Ups with Other Exercises
Wall push-ups shouldn't be done in isolation. To build balanced strength, pair them with pulling exercises. The biggest gap I see in beginners is that they only push. They develop strong chest and triceps but weak back and scapular retractors, leading to rounded shoulders.
Recommended pairing: After your wall push-up sets, do 3 sets of 10 to 15 scapular retractions. Stand facing a wall, place your palms on the wall at shoulder height, and pull your shoulder blades together without moving your arms. Hold for 5 seconds. This balances the pushing motion and improves posture.
Another great pairing is the wall slide. Stand with your back against a wall, feet a few inches away. Raise your arms to a goalpost position (elbows and wrists against the wall). Slowly slide your arms upward without letting your lower back arch. This opens up the chest and strengthens the upper back. Do this before your wall push-ups to warm up.
If you want to turn your wall push-up routine into a full-body workout, add glute bridges and bodyweight squats. That gives you a push, pull, squat, and hinge pattern in one session. As you progress, you can use the Yoga Calories For Beginners Calculator to see how many calories you're burning during these gentle movement sessions -- it's a nice motivator to see the numbers add up.
When to Move On: Concrete Checkpoints
One of the most common questions I get is: "How do I know if I'm ready for harder push-ups?" Here is a simple decision matrix based on the Wall-to-Floor Progression System.
- Stage 1 (Wall) to Stage 2 (45° incline): Can you do 3 sets of 20 wall push-ups with perfect form, no pain, and no shaking? Yes? Move to incline.
- Stage 2 (45° incline) to Stage 3 (30° incline): Can you do 3 sets of 15 incline push-ups with your body at a 45-degree angle, with full control? Yes? Lower the surface.
- Stage 3 (30° incline) to Stage 4 (floor): Can you do 3 sets of 12 incline push-ups at a 30-degree angle, with no arching or flaring? Yes? Try a floor push-up. If you can do 1 rep with perfect form, you're ready. If not, stay at Stage 3 and increase volume to 3x15.
If at any point you feel pain (not muscle fatigue), step back one stage. Pain is a signal, not a challenge. I've had to tell many beginners to go back to the wall because their shoulder wasn't ready. There's no shame in that.
What Most People Don't Realize About Wall Push-Ups
The thing nobody tells you about wall push-ups is that they are a fantastic tool for improving your mind-muscle connection. When you are on the floor, the load is heavy and you can't easily feel which muscles are working. On the wall, the load is lighter, so you can actually sense the chest contracting, the triceps extending, and the serratus anterior (the muscle on the side of your ribs) firing. This awareness carries over to every other push-up variation.
Another nuance: the distance from the wall changes the difficulty. The farther your feet are from the wall, the more body weight you have to push. A common mistake is to stand too close, making the movement too easy. Experiment: start with feet about 2 feet from the wall. If 3x20 is too easy, move your feet back another 6 inches. This is a built-in progression within Stage 1 itself.
Sample 4-Week Routine for Wall Push Up Beginners
Here is a plan I've used with dozens of clients. It assumes you are starting with Stage 1 (wall push-ups) and have no injuries.
Week 1: 3 sessions (Mon, Wed, Fri). Each session: 3 sets of wall push-ups. Start with 8 reps per set. If you can do 8 with good form, add 2 reps each session. By the end of week 1, you should be at 3 sets of 12. Rest 60 seconds between sets.
Week 2: 3 sessions. Increase to 3 sets of 15. Focus on the 2-second lowering and 1-second pause. Add scapular retractions: 2 sets of 10 before your push-ups.
Week 3: 3 sessions. Aim for 3 sets of 20. If you can do this, test yourself on a 45-degree incline. If you can do 3 sets of 10 on the incline, move to incline. If not, stay at wall and add 2 extra sets (total 5 sets of 20).
Week 4: 3 sessions. If you moved to incline, do 3 sets of 12 to 15 on the incline. If you're still on wall, increase to 3 sets of 25. By the end of week 4, you should be ready for the next stage.
Remember to warm up before each session: 5 minutes of arm circles, cat-cow stretches, and wrist circles. Cool down with chest stretches (hold a doorway stretch for 30 seconds per side).
Honest Limitations: When Wall Push-Ups Are Not Enough
Wall push-ups are excellent for building foundational strength, but they have limitations. They do not load the triceps and chest as heavily as floor push-ups, so you will not see significant muscle growth if you stay on the wall forever. Additionally, they do not challenge your core as much because the angle is vertical. That's why the progression system is essential. If you have a goal of building visible muscle or being able to do 50 push-ups, you must move through the stages.
Also, if you have certain shoulder injuries like a labral tear, wall push-ups might still be too stressful. In that case, consult a physical therapist. For most people, however, wall push-ups are a safe gateway.
Final Thoughts: Start Where You Are, Progress With Purpose
Wall push-ups are not a beginner's crutch; they are a beginner's launchpad. I've seen people who couldn't do one push-up go from wall to floor in eight weeks by following this system. The key is patience and honesty with yourself. Don't skip the checkpoints. Don't let ego dictate your progression. And if you ever feel stuck, go back to the basics. The wall will always be there to welcome you back.
Use the tools you have: a wall, a bench, and your own body. Track your progress. And when you're ready, step off the wall and onto the floor. You'll be surprised at what you can do.